Saturday, October 26, 2013

I HEART MY LABEL MAKER


Is it possible for someone to LOVE an inanimate object?  <3


I am absolutely in love with my Brother P -Touch PT-1280 Label Maker.  I should probably purchase stock in the company, as well as some in Staples, where I get the label tape.  It was a Black Friday special a few years ago - that I actually got for super cheap (I think it was $5-10 with another purchase.  At that point, it came with two cartridges of white tape/black ink.  I only purchased one, and Santa delivered it under the tree.  Other than my coffee maker, I think it might have been my only present that year. I wish Santa was twice as nice - I could have one at home and at school...

I was pretty boring putting it to use; mostly to label storage bins in the attic with "Halloween Costumes", "Camping Gear", "First Aid", and "Kid Clothes: Winter".  Effective... but BORING!  There was a label everywhere in my house.  Bathroom closet, pantry, kitchen drawers, bedroom drawers.  On any surface I could find - But of course, it allowed for every item to have a home.  The most difficult part was training the family to REPLACE things into those respective places!  The youngest in the family is still as the 'pile' mentality - then complains when he has no socks (they're stuffed in the drawer labeled shirts... and yes, he is old enough to tell the difference!)
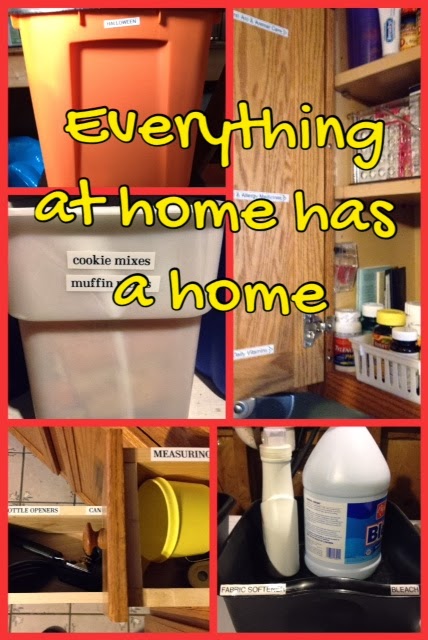

When summer came and I had to put my name on EVERYTHING in my classroom for the custodians to know where to move the furniture, not only did the label maker come in handy (and the kids helped put the labels on EVERYTHING) but I discovered COLOR TAPE!   My room became LIME GREEN.  It made things very easy for the staff to identify which tables and file cabinets were mine.  They appreciate, and it lasted several years intact.  Time Saved!  I'll have to take some pictures next week at school to truly give the scope of how my obsession has carried over into the workplace.  That will be in a future post :)


Over the past 12 months, I also have taken charge of the home office and the family finances.  Organization here is both an overwhelming and a necessary task.  The committing to labeling both file folders, dividers, and binders forces me to categorize, purge, and design efficient and appropriate systems for tracking all that paper.   Still a work in progress, but MUCH better than in the past.

For extra-curricular activities, mostly stored in the garage, accuracy in the items as well as creative containers did the trick.  Originally, most of these were labeled with Sharpies on the outside of the recycled or re-purposed container, but as their roles were more solidified, I committed to the printed label.  This will also allow me to hand-off the containers to the future leaders of our Scout Pack, with the instructions/activity/event easily visible.  My favorite containers are the plastic coffee cans.  I have both the sizes in primary Blue and Red (compliments of Maxwell House and Folgers) that also add my color pallet in my classroom.  The larger ones also have molded handles which small hands can easily pour, scoop, or grab.  This works GREAT as storage for toilet paper on campouts (with the lid, it stays dry) or for extra twine balls for tarps or twine (drill a small hole in the lid and pull the twine through).  I hope that my planning can be appreciated by the next leader that follows...


But in the time that has passed, I have been enlightened with the wide variety of COLOR TAPE and have had more stability in my filing systems to actually commit to labeling my materials rather than just writing in a Sharpie. (Combined with my lousy handwriting, and my envious nature of a colleague with 'Font-Ready' print, this was the answer to my prayers!).  It's a bit more expensive, and sometimes only available online (which adds to cost with shipping... unless you can time a savvy deal), but it also comes in a RAINBOW of colors!  I currently have yellow for some of my binders at school (mostly templates in storage) and am searching for a sale on Blue and Purple for my new curriculum series.  My favorite for my Thirty-One Gifts Business has been the Berry Pink Tape with White Print.  I can sharpen up a boring folder with a splash of PINK - and who can't use a little pink in their life!

 
So even though I sometimes I feel overwhelmed with the paper clutter in my home, it does appear that I am making 'effective progress'.  Do you have similar issues?  Do you have a favorite labeling product?  Comment below and share your thoughts!


Sunday, October 20, 2013

Top 5: Ways to Share My Stuff!

After almost 20 years of teaching, I have learned one thing.  I have too much stuff.  Stuff in my desk drawers.  Stuff in my closet shelves.  Stuff on my hard drive.  Stuff in my head.

There must me a way to share this STUFF with others before I drown in my clutter!!!


So I have come across several ways to SHARE THE STUFF in my most appropriate Top 5 list!

First, Craiglist is my first line of defense.  I have both sold and purchased items on Craigslist and have had some very positive exchanges.  It's great to have a local resource and as long as you do your own research and contact, you can find someone who wants YOUR STUFF!  I have purchased a great repurposed coffee table, closet shelving, sturdy bookshelves and some great Halloween decorations at very reasonable prices.  It's an online tag sale where you can find exactly what you want!  I also have been able to sell off extra roofing shingles, paint, a Pinball Machine, several bikes, a couch, car replacement headlight bulbs (for a car I no longer have), Cub Scout books and uniforms, and computer manuals I no longer need but a college student wanted them for $2 each!  It's all cash transactions, but someone's trash is someone else's treasure.


Secondly, Ebay has been my second line of defense.  This is for specialized items, that may not be for the general public.  I have posted several subject specific books, teaching manuals from my personal collection, DVDs and VHS tapes (yes, people still want VHS - especially old Kid Cartoons!) and Fisher Price toys and clothes after my kids had outgrown them but they still had lots of life left.  I also have been able to find specific items, either antiqued or collectible, for both personal and gift-giving.  It can be quite addictive.  But if you are willing to investigate shipping methods and costs, it can be quite lucrative.  I have gotten burned, however.  Mostly due to my own poor calculations.  The worst one was an antique movie projector I had gotten for free, that I sold for a reasonable price, but didn't specify additional charge for shipping overseas.  My customer, in SPAIN, was the recipient of a great item, with me having to eat the additional cost to ship to him.  Lesson learned.

Next, is TeachersPayTeachers.  This is a relatively new find for me, but something that I am excited about the ability to share my KNOWLEDGE and PRODUCT DEVELOPMENT with my colleagues.  This is something I've done within my own school and district before, but not on a larger basis.  I haven't even done a presentation at a Regional or National Conference, but feel like I have 'been around the block' enough that I should be able to!  Maybe this is the stepping stone I need.  TeachersPayTeachers is a marketplace where individuals can post their work electronically for purchase by others.  This is a HUGE resource for me - a simple search on the site for Interactive Notebooks got me TONS of resources and allowed me to take the leap that I had wanted to for so long (can you tell I'm psyched!).   I have my own store now, with a few items uploaded awaiting other eager beavers to find them and give them a try.  The toughest thing for me with this now is getting the packets/worksheets/assessments that I've made over the years into a streamlined, uniform format that will represent me.  And have a key for everything.  I think that's my downfall - I ALWAYS recreated my answer key every time I gave a worksheet.  That way, I had to think about the questions from my student's perspective.  However, I don't seem to have answer keys for anything!  Might have to search for more... Check out my store HERE!  I think the challenge is going to be throwing the paper copy of something away once I get it digitized...


An off-shoot of this is Pinterest, but not so much as an income possiblity, but from a sharing-of-ideas way to share my stuff.  Though this is VERY EASY to get sucked into and not have much to show for... but I do get a lot of cool thinks pinned for later (when I have time...ha ha).  I've pulled out my past craft, scout, and school pictures and posted a few.  It's a great way to share ideas without having to have all the directions, materials, or procedure (unless you want to).  Although I don't know how much clutter I really am getting rid of with this one, it sure is FUN!

And to round out the top 5, I've jammed the rest into the STAND-BY category.  I still have the old stand-bys of a tag sale (or yard sale, barn sale, garage sale, flea market or whatever you call it) and our Town Dump has a 'Swap Shop' where you can bring something and swap it out for something else rather than throwing it away (I've gotten LOTS of dishware and garden pots here, my kids used to like looking for toys).  Goodwill and Salvation Army also are helpful for clothing and other linens that still have lots of wear in them.  Our local Boy Scout Troop just had an Electronics Recycling Fundraiser where, for a small fee, residents could bring their old/broken appliances and they would haul them to the scrap metal yard.  I was able to finally clear space in my garage from a broken dishwasher, a dead air-conditioner, and an old washer and dryer that had been there for over 9 months!  Yay!  Of course, this is helpful to get stuff OUT OF THE HOUSE, which is part of the idea in the first place.  I would like to reclaim my garage, my basement, and my dining room table from the chaos that is my life.  It's a step in the right direction.

What is YOUR favorite method of sharing your goodies?


Thursday, September 19, 2013

My Bright Idea: Classroom Jobs

Student cooperation has always been a slippery slope for me in an Eighth Grade class.  I don't know if I ever 'learned' how to cooperate, or if it was something that was expected of me at home, and therefore it translated to school (thanks Mom and Dad...).  So getting kids to buy-in to the classroom environment has been a goal of mine this year.

I had a few items that I've implemented into my classrooms throughout the year, but this year, after surfing Pinterest all summer and viewing elementary school items, I had an epiphany.  I've been using a High School model and expectation of my classroom, and been increasingly frustrated as my students devolve into less mature beings (that can certainly be the subject of a future post in my society views...).  So I did a bit of a flip - use some of the elementary ideas into the Eighth Grade classroom - like weekly JOBS.

This is a bit of a challenge with multiple classes.  Some of the ideas like clothespins tracking on a poster or a bulletin board with pockets might have gotten a bit overwhelming and confusing with multiple classes.  However, the need for this, especially with a 90-minute class, was necessary for both routine and the multiple transitions that I was implementing this year to deal with the large chunk of time.

So my idea was to use the Playing Cards that each table group would have picked (one card per student, four students per table) and assign a JOB for each of the suits for the week.  Students would document their suit on their table folder (the subject of a future post) and their table would hold them accountable (as would I) for the duration of the week.  Each week the kids would have the option to change cards (therefore changing a job), or their seats would change which would require an automatic change of a card.  I also reserved the right to alter the jobs as I saw fit (or consolidate if they were too small, or expand if they were too big).

Right now, our four jobs are CADDY CONTROL (supplies), FOLDERS/TRASH, HOMEWORK TRACKER, and PREPAREDNESS TRACKER.  Of course, the most coveted one so far is CADDY CONTROL (see the post HERE), but the kids who have TRASH seem to like the dramatic dumping into the recycling bin before they can be dismissed.  It's great to watch them scurry to get their tables clean - and remind their classmate to do their job!  I do have one class with two groups of five.  I'm trying to think of an elective job for those two extra 'Joker' students.  We'll see how that pans out.

It has also created a routine upon both entry and exit of the class.  The two Tracker jobs are completed within the first five minutes, and afte
r two weeks of tracking, still requires some clarification daily, but I'm hopeful that the time spent now will reap rewards later.  Both are part of the students grades, but keeping an accurate eye on it should be OK in terms of accountablility.

I would LOVE ideas or suggestions for my system.  Please share or comment below!

Tuesday, September 10, 2013

Caddy Control

The year is now in (relatively) full swing, and I am proud to declare that I may have just established the best routine in my (gasp) 18 years of teaching:
  
the table caddy of supplies.

Now that I may have completely jinxed this new addition to my class, let me explain the need for this corralled chaos.

This year, I've taken on the challenge of the Interactive Notebook, or at least my version of one.  In doing to, I've also found the need for more 'cutting', 'pasting' and highlighting items into my students' work.  I assumed that the kids wouldn't have most of their supplies for the first days, so based on my activities, I supplied tape, scissors, glue, and markers.

I also found that setting the stage with community building activities, table groups, and constant flux in those groups was going to be a huge portion of my 90 minute Math classes this year.  (Sitting for 90 minutes straight was going to be waaaaaaay to long for my 8th graders!)  So I started the year with six groups of four in all my classes (of course, the last class requires two groups of five, since I had 26 students, and made me scramble for two more seats... but that's for another blog).

Each table was numbered and students were assigned groups based on these numbers.  Each table was identified by a stenciled number taped to a cylinder.   This cylinder is actually a LIFESAVER.  Not only is it acting as a group marker, but also is used as a trash bin for the table.   It's transparent, so it's easy to see when they need to be empty (or I prompt the table to do so).  I also can use it to clip the frequent table re-groupings for identification (that will be the subject of a future blog post).

These cylinders were marketed as a (wait for it) microwave spaghetti container, complete with lid and strainer (on sale for $0.88 each).  They're very solid plastic, a resin perhaps, and I hope they'll last quite a while for their current purpose.

The other lifesaver is the SHOWER CADDY.  I have used various plastic bins in the past for materials in class, but they always had 'issues'.   My markers were stored in Parmesan Cheese containers (perfect size for a standard Crayola set, complete with lid, and transparent plastic).  My colored pencils can fit in a green nut container, washed thoroughly and without the lid.  But in the past, these containers were always tossed around, sent rolling off the table, or not replaced on the shelf after usage.  It was hard to keep track of, even when I tried to play the 'matching game' with colored stickers.  I didn't train the kids well enough, and it became too frustrating to maintain.  So when I say on Pinterest the shower caddy, I was IN LOVE!  When I found the perfect plain Jane caddy at Ocean State Marketplace in June, I JUMPED!  And they sat on the shelf for 3 months while I waited for the new year to implement my new system.

During summer school, I tried out the supply system with another method I saw on Pinterest, the Silverware Caddy.  I had accumulated 3 of them and filled them with supplies for my two 2.5 hour classes each day.  This was only for 2 tables and allowed me to try some things out.  It was OK, but I was looking forward to my Shower Caddy system and starting an adjusted system for the new school year. (and I also lost all 6 of my pencil sharpeners during the summer program and have YET to gather inexpensive replacements)

In addition to the green colored pencil holders and the Parmesan Cheese marker containers, the caddies hold the groups Graphing Calculators that are available (rather than kids always getting UP to get them), protractors for the group, six-inch rulers, scissors (tip down), and glue sticks.  I also am in process of gathering a tape dispenser for each group.  It may be too big for the caddy, but will be marked with the group number as needed.  One of the JOBS that I also have created for each group is CADDY CONTROL.  This student is responsible for making sure that the caddy is in good shape before the table is dismissed.  So far, the kids have been receptive.  I usually go through the list 'colored pencils: tip up (to protect the sharpened ends), scissors: tip down, trash: emptied, markers: cap up (to ensure they're on)', but the kids have been helpful in cleaning up their communal space and that makes my life just a bit easier.  Maintaining it will be a challenge, but it will also force ME to get into a good routine.

So far, so good (let's hope I didn't jinx it!)


Friday, September 6, 2013

Setting Goals and Sticking to Them


As the school year is getting into full swing, I finally have a chance to comment on my goal setting strategy with my students.  The challenge, to get them to commit to EIGHT goals (Seven of which are academic) in their Interactive Notebook this year.


The introduction of this task was clear:  Eighth Graders should have EIGHT goals.  Goal setting allows you to see progress, be motivated, feel accomplished.  Goals can be LARGE items or LONG TERM GOALS (like running a 5K) or can be broken down into smaller, manageable goals or tasks or SHORT TERM GOALS (run around the block, then move up to running for 15 minutes, then for a mile...etc).  We compared this to a series of stairs.


I hope to check in with the students on these goals several times a year to check on progress.  Some ideas about motivation, is making paper chain to hang around the room as we accomplish some of these goals (as a class) to add or stickers to add to their traced hands that they posted in my classroom.

At the end of the year, I hope to have an opportunity for students to complete a Goal Board to take with them.  I found that idea from a fabulous resource Teacherspayteachers.com where my teaching colleagues can post lessons and other resources that they have created.   I also have made a template of my own Quarterly Goal spreadsheet modified for usage that is available for FREE!  We'll see how the year progresses and how these kids strive to reach those goals!

 Create A Goal Board (Smart Goals)s by The SuperHERO Teacher
Template Quarterly Goals  by Stefani's Hope


Sunday, September 1, 2013

Garden Chaos - Top 5 things I will do again!

I was debating blogging about this, when I realized that I really didn't document the season to truly capture it all... I vow to do better next summer!  Regardless, it's time for the

Top 5 things 
I vow to do differently next summer 
in my garden.

Tip #1: Plant early to reap the harvest early!  This year, we didn't get the garden planted until well after Memorial Day (I typically plant it April Vacation week, even though it's still fairly chilly).  Procrastinating at the beginning lead to a later harvest, and with travel and weather complications, less of a yield.  Next year, I will vow to be out there daily.  Monitoring and weeding - little by little.... a little becomes a lot!  The task won't be insurmountable and I'll get some exercise too!

Tip #2: Get the garden organized and spaced well.  This year, we completely struck out with this one.  We expanded the garden to both a front yard and back yard section.  We didn't plan the front well at all, and we over planted the back.  Though it's looked fairly pathetic for the last several weeks.  In fact, to the point of embarrassment for the area on the side of the house, newly converted from crappy grass to fertile soil.  The tomatoes were tall and stringy and the vining plants weren't trellised.  Next year, we'll consider the spacing required for the plantings as well as the overall aesthetic of the garden itself.  Curb appeal still holds true.

Tip #3 :  Check for ripe veggies DAILY.  Both the zucchini and cucumbers got away from us (it didn't help that I was not home for 3 prime weeks this summer).  So the canning process for the cukes has resulted in some true Hamburger Chips - with the diameter of the burger itself.  That made it a bit tricky to can (I needed to get the wide mouth jars) but should result in some great dills later this year.  Note to self:  be sure to note HOT on the label of the Jalepeno Dills.  They get exponentially hotter when canned.  Great if you like hot stuff, not so much if you aren't expecting it.  We also dehydrated some of the peppers, eggplant, and cherry tomatoes.  Hopefully the tomatoes will be like a version of a sun dried tomato to spice up soups and salads this winter.

Tip #4: invest in a food mill or blender.  I have
my blender/food processor method for tomato paste/sauce, but others in my household have much more finicky tastes (and are quite LOUD in expressing those tastes).  I should hold my own, but sometimes you have to pick your battles.  A food mill allows you to press the pulp through and extract seeds and or skins from foods like tomato sauce.  This year, I didn't have one, but I did remove the skin from the tomatoes (though my scalded fingers don't quite appreciate the effort).  I think that will help the sauce department.  I do wish we had more of a crop for my salsas and chutneys, but I suppose they will have to wait until next year.  This year's crop of made into sauce.  I can't WAIT for my fall chili!


Tip #5: Compost is the key to fertile soil and next year's crop.  We had two methods of amending the soil this year.  First, the basic compost pile in the corner of the backyard.  Yard waste, food wastes, grass clippings, weeds, shredded paper, it all was added to the pile, watered and turned frequently.   This is something that I've done for years, but this year as the first we had a prime crop of Red Wiggler Worms added in.  They did what they are made to do:  eat, aerate the soil, poop, and procreate!  And the soil was wonderful and the worms were plentiful - to the point that we took some out and added them to the compost bin outside as well as directly to the garden soil!  We added the 'Juice' to potted plants and they perked right up.  We supplemented the topsoil when we transplanted the seedlings with 'Worm Manure' and it was not full of nutrients for our infant plants.  The plants did grow quite tall and produced lots of fruit (the tomatoes were huge, but took forever to turn - we assume that was weather based, not soil nutrients).  The only drawback is only having 3 trays for the worms.  Once they are established, they do need frequent maintenance (adding food scraps, draining excess fluid from the tray, removing manure to add room for the worms).  Lets just say, these worms will remain in my basement and will be fed throughout the winter.  I'm debating how to store the 'Juice' during the winter months.  Part of me wants to store it and save it for Spring, the other part of me says it's too fragrant (with the cap off).  We'll have to see.  I do know, though, the worms are more than welcome to return to my garden next Spring if they will contribute to my Garden's Bounty again!

I vow to take better pictures next year, so a timeline can be chronicled.  But until then, I'm off to can some tomatoes and finish my sauce :)


Friday, August 23, 2013

Visual Timer - my favorite clock!

One of my most favorite finds is my VISUAL TIMER that I use both at home and at school.  It has become a HUGE time management component of my eighth graders as well as the contingent I had during July in summer school.  It's sitting across from me RIGHT NOW as I type this as well!

I first saw this from Alejandra's YouTube site  http://www.youtube.com/user/HomeOrganizing and her own website.  She has some great ideas and I needed to find ways to structure my own time at home and in the classroom - to fight off those time vampires (Facebook, Email, etc) to put myself on a schedule to get things done.

My timer can be set up to sixty minutes by just sliding the plastic disk to the desired time.  Unfortunately, my students enjoy setting and resetting (especially when they're NOT supposed to!) but it since it always 'beeps' four times then stops, you don't have to stop what you're doing to turn it off. That makes it convenient to wrap up stuff and then reset it to the next option.  I like that better than other types of timers that keep going until you turn them off.  My colleagues like this one over my 'bus duty' alarm on my phone that sounds like the fire alarm.  (If I leave my phone on my desk in the morning...it continues to go off...oops!)

I also like the fact that it's NOT an overhead model.  I can prop it up on the chalkboard tray and kids in the back of the room can see it.  It also shows the time remaining in an ANALOG way... something that my kids are quite week at in this digital age (It's depressing how many fourteen-year-olds CAN'T tell time on my analog clock!!  I also still use the timer app on my phone, both this type of version and a digital version, but I'm in LOVE with this timer!  I hope to post pictures of it IN ACTION during my lab stations this year.

I bought my two from Amazon, but you can also find information about timers like these at Timetimer.com 

Enjoy! - Stefani